Home Inspections

Very often I hear people say: “my furnace is broken” or “the furnace is new”,  but it’s not a furnace they are talking about at all.  Most of the time they are talking about a Boiler.  Some people just call everything that creates heat in the home a furnace and this is not true.  Let’s do a comparison and see the differences and how to spot them…

BOILER: AKA Forced Hot Water.  Pushes hot water through the home inside pipes and radiates heat through the home using baseboards or radiators.

Above is a boiler in the basement.  It pushes hot water through copper pipes like these below…

The heat gets into the rooms above through baseboards or radiators like these below…


FURNACE:  AKA Forced Hot Air.  Forces hot air through the home using a fan and ducts.

The air gets pushed up through ductwork like this…

It comes through the floor, wall or ceiling through duct covers like this…


The fastest way to tell what which kind of system you have is by walking in the front door and looking around the outside of the room.  Heat supplies are always on the exterior of the home and if you see air duct covers you know it is a furnace, if you see baseboards or radiators you know it is a boiler.

There are many more differences and pros and cons to each kind of heating system but that is for another blog.  When purchasing a home make sure that you know which system you have and how to maintain it.  In case you are having problems you want to know what to tell the HVAC person you are on the phone with so they know what they need to fix it.

If you have any questions about your heating system feel free to reach out to us and ask.

Read more

What the heck is Knob and Tube wiring?

The short answer is it is something that you do NOT want in the home you are buying, or any home.

Knob and Tube was the first kind of electrical that was used from about 1880 to 1930-ish.  It looks like this…


The Knobs hold the wires in place and the tubes protect the wires when they go through joists and wall cavities.   There are only 2 wires, a hot and a neutral, no grounding and they are both covered in a cloth sheathing so it is hard to tell which is which.  A non contact voltage tester is the best way to tell if this wiring is still in use or not.  Sometimes the wiring is cut and not in use but the wires are left in place.  Sometimes it is still in use.

If you are purchasing a home and there is LIVE knob and tube you want to get an electrician out to take it out and replace it right away.  Knob and tube is no longer the electrical standard and poses a fire risk.  Especially when it is buried in old cellulose insulation up in the attic or behind the walls.  Not only is this a safety issue but it can be a homeowners insurance issue.  If you own a home with knob and tube and a fire is caused by it, you may not be covered.

The best places to spot knob and tube wiring is in the basement (look up) and in the attic (look up and down).  Also these old light switches are commonly wired with Knob and Tube…

Gently take the cover plate off, NOT the switches!  Look on the side for the cloth wiring.  If you see cloth wiring call an electrician.

Knob and Tube wiring should be removed in all homes.  Make sure to share this with anyone you know that has this type of wiring in their home still.  If you’re not sure snap a picture and send it over to your electrician, or send it to us here at Knox Home Inspections and we can help you out.

Read more

Typically when buying a home people are always worried about service size for their electrical systems?  Do we have 100 amp or 200 amp?  That is how much power is coming into your home and how much your main panel can safely handle.

One thing that people don’t often think about is WHAT BRAND is my main panel?  There are a bunch of different kinds…. Cutler Hammer, Crouse Hinds, Square D, General Electric, ITE, Siemens, etc.  Then there is FEDERAL PACIFIC.

Federal Pacific was a company that started in 1950 and was very popular all the way up to 1988 in some areas, including America and Canada.  Over time these panels had a higher failure rate than other panels.  Studies were performed and it was found that these panels had several different problems.  Mainly with the inability to trip the breaker off when necessary.  Other breakers will shut off and stop the flow of power and prevent a fire.  The failure rate on other brands of breakers is much much less than a Federal Pacific breaker.

It is estimated that Federal Pacific Panels are responsible for 2000 fires ANNUALLY.

Luckily an FPE panel is very easy to identify.

  1. Look for the bright RED tabs on the breaker fronts.  No other brand uses this style of breaker size indicator.  Think red = danger / red = STOP
  2. There may be a sticker with the company name still on it, either inside the panel cover or near the top.
  3. The breakers are BACKWARDS!!!!!  On any other panel the breakers are pointing towards the center when they are switched ON and they are pointing to the outside when they are OFF.  FPE breakers are opposite and it makes the cover difficult to remove.

When shopping for a new home make sure to look at the BRAND of panel that you are buying and discuss it with your Home Inspector.  If you see the warning signs above you should plan on a full panel replacement.  May as well call an electrician for a quote right away and save time, your home inspector will recommend a replacement anyways.

If you know anyone with one of these panels in there home, please, urge them to replace it.  Or at least call an electrician to tell them more about the danger.

Read more

When I tell people what I do: ” Oh you must see some crazy stuff during Home Inspections…”

Me: “You have no idea…”

This conversation happens pretty often so this blog is for that. I will add good ones as I find them. Do NOT keep scrolling if you are a first time home buyer.

14. Mold in the attic. All ventilation had been covered up.

13. Nobody mentioned a fire in the property disclosure.

12. Caught you red handed squirrel…

11. I don’t even know what this roof is doing. Not much really.
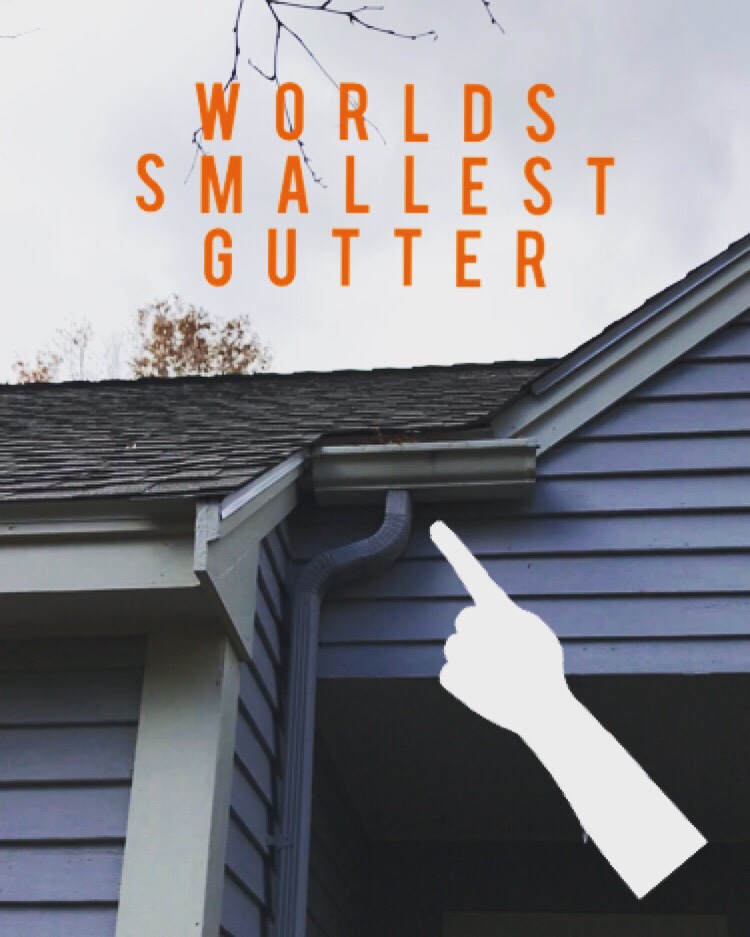
10. Gutter or planter???

9. Messy electric work.

8. 2 different roofs, pretty common problem.

7. Another…

6. Roof leak

https://a0b506.a2cdn1.secureserver.net/wp-content/uploads/2018/04/img_9042.mov

5. Lites. 😂

4. Wooden panel cover?

3. Why the extra long gutter?

2. Worlds smallest gutter.

1. Hole in the roof

Read more

If you are buying a home with a well system and not public water you should absolutely be doing a water quality test.  It is best to test the water during the due diligence period you have as a buyer so that if anything comes up in the test results you will have time to consider your options and work out a solution if there is a problem.  Filtration systems can be expensive depending on what you need to remove.

The most common water quality issue that I encounter during the Home Inspection process is Coliform Bacteria.  Coliform is a required test for VA (Veteran Affairs) mortgage loan.  If Coliform is present in a home being bought with this type of loan it will need to be removed prior to purchase.

Coliform bacteria is referred to as an “indicator” organism.  Not all Coliform will carry diseases but they can indicate the presence of other bacteria and viruses that can cause illnesses, such as E. Coli.

If your water test comes back with Coliform present you will want to treat your well system.  This can be done by installing a whole house Chlorination System, Open Air Chlorination System or a UV filtration system.  Each home is different and a water quality and filtration professional should be consulted before investing in a system by yourself. 

If a filtration system is out of your price range another option is “Shocking” the well.  This is a process that involves putting a bleach solution down the well and flushing out the system.  There is a chance that the bacteria can return and you should test your water regularly if you do not have a filtration system in place.

If you are a home buyer and your potential home has coliform present you will want to have a professional shock the well.  Unless you plan on doing it yourself.  You do not want the current homeowners to shock the well on their own.  They may have a friend do it that doesn’t have any experience or know what to do.  They also may not even do it at all and tell you that they did.  I bring up this possibility because I have seen it before.  If you are going to have the sellers correct the issue make sure that you get receipts from a professional well company and follow up with another test to ensure the bacteria is gone.

Here is a basic guideline on shocking a well.  Keep in mind that every system is different and may need different procedures.

  • A typical solution for shocking a well requires 2 cups bleach and 10 gallons of water.
  • Dump the solution into your well.
  • Run a hose from the home to the well and run the water into the well to promote mixing of the solution. When you smell bleach coming out of the hose, shut it off.
  • Allow the well to sit for a few hours.
  • Run the exterior hoses away from the home and any plants and vegetation.
  • Run all the interior faucets and flush the toilets.
  • The flushing process can take a few hours or repeated flushing over a few day.
  • You may see brown water coming out of the faucets during this process.  This is common and is from sediment breaking up from the bleach solution.  Keep running the water and it should work itself out.
  • When you no longer smell bleach at the faucets you should be all set.  Chlorine test strips can also be used.
  • You should re-test your water about a week after shocking to ensure the bacteria is removed.

During the shocking process you should NOT use your water supply.  Here are some other things that you should NOT do during this process:

  • Drink the water
  • Shower
  • Give water to your pets
  • Water your plants
  • Do Laundry (the bleach may discolor your clothes and the rust deposits may stain your clothes)

Like any issue found during a Home Inspection, Coliform bacteria is easily fixed if handled properly.  If shocked properly the water may remain clean for a long time or it may not.  Most experts will advise that you test your well water once a year, while some say every other year.  If you have a shallow dug well you may want to test your water twice a year or more.  Especially if you live a quarter mile from a dairy farm with 100 cows.


I have also seen coliform form inside of a water softener brine tank.  The salt had not been filled and the tank had filled up with water which had a nice thick layer of growth on top of it.  A plumbing cross connection can also back flow waste water back into the system causing contamination.

There are many different ways that Coliform and other bacterias can enter your water supply and several different ways to treat it.  Obviously a high quality filtration system is the ideal solution but if that is not in the budget than hopefully a bottle of bleach is and you can clean your system.

Read more

The Home Inspection process can be a stressful time for any home buyer.  My goal is to make this time stress free and smooth as possible for you and your real estate agent.  I am writing this piece to prep you as the buyer for your home inspection.

Let’s assume that you have finally found “The One” and your offer has been accepted.  Your next step is to find an inspector and get your inspection scheduled.

  1. Scheduling the Inspection.  Your agent should be there so communicate with them and your inspector to make sure you pick a day and time that works for everyone (you most of all). Your agent has done many of these, and having them with you is a great resource.  They will help you along the way if anything comes up.  Couples should BOTH be there, it makes things much easier and keeps everyone on the same page.  You normally have 7-14 days to do your inspections, this is called your “due diligence period”.
  2. Do you want to test the water?  If you have a well you MOST DEFINITELY want a water test.  If  you have an FHA or VA loan and your home has a well, you may be required to get a test.  It is best to know what condition your water is in before you start drinking it. “Buy a filter or be a filter…” I hear that saying a lot.  There are many different contaminants that can get in your water.   Here’s more info about Water Quality and contaminants. 
  3. Radon air testing?  The EPA requires a 48 hour minimum test because radon levels can fluctuate from hour to hour.  Things like temperature and humidity can affect the levels. Knox Home Inspections uses specialized equipment to get your results immediately after the required 48 hours.  Our equipment will give you the most accurate reading possible with over 200 data points. Other inspectors may use a lab which can take 2-3 days longer.  Let us know and we can set the test ahead of time saving you and your agent valuable time.  More info about Radon Air right here.
  4. Septic Evaluation?  It is a CRAPPY job, literally.  We leave that to the septic evaluation companies that are licensed specifically for that.  If you want a septic evaluation we can coordinate with a few qualified companies to get it done at the same time as your inspection.  They will provide you a separate report that will show you more than you probably want to know about what goes down the toilet.
  5. Inspection Day.  Your inspection will take 2-3 hours depending on the size and condition of the home.  Make sure you block off enough time to be present the whole time.  You will be glad that you did.  You are about to learn A LOT about your new home.
  6. Bring a Tape Measure.  Bring your camera too.  The inspection is a great time to take your own pictures of the rooms and to measure for things like fridges, couches, beds, dressers, etc.  Your inspection report will have a bunch of pictures, but not the kind that will help you plan out your new home office layout.
  7. Dress For Success.  Wear something comfortable and that you don’t mind getting dirty.  Sneakers or boots are good.  Dress warm or bring an extra layer.  The weather doesn’t always cooperate and sometimes the houses can be cold if they nobody is living there.

The next 2 blogs will focus on the DURING and AFTER parts of the inspection process so look out for those very soon.  Thank you for reading and feel free to comment.  I love feedback and will edit this blog if anything good comes up.  For updates and more information connect with us on Facebook right here!

Read more

YES!

End of blog.

Jk, here are some reasons why you absolutely should inspect your potential new condo.

Condos can be a great option for first time home buyers, or people that don’t want to mow the lawn, or maintain a pool, etc.  There are many benefits to owning a condo, there are also some cons.  Every condo association has a set of rules, and fees.  You will want to get a hold of these documents before putting in an offer on your new condo.  Having a good real estate agent will help a lot with this process.

The rules are laid out in what is called a Master Deed, or the Covenants, Conditions and Restrictions (CC&R).  The master deed will lay out how the condo association is governed and the policies for how things run.  The CC&R will lay out rules ranging from: Pets, parking, outdoor grills, hanging laundry, changing exterior designs, roofing, maintenance, quiet hours, etc.  There can be many rules.

With almost all Condos there are monthly fees.  These fees go into the budget for maintaining certain things around the common areas of the condos.  Landscaping, plowing, roof replacement, decks, balconies, siding, etc.  Most associations want the units to all look great which will keep the value of the units up and the tenants happy.  If the roof on one condo has seen the end of it’s days, the association will replace it and use the money from everyones monthly fees to do it.  This can be a great thing for a condo owner.  If the roof leaks and damages the inside of your attic and the insulation, most of the time that is covered.  However, if the pipes burst in your upstairs bathroom and damage the ceiling in your kitchen, that is not the responsibility of the Condo association.  This is why you want a home inspection.  Having an inspection will help you to determine what is and is NOT covered by the HOA and what issues may be inside your condo, or what issues may come up in the future.  Repairs are not a matter of if, but when.

Here is a leak that was found inside a Condo using thermal imaging.  

Without thermal imaging this leak would never have been seen, it cam from the refrigerator water line from the unit up above.  Without an inspection this buyer could have bought this unit and walked into a condo with an active leak above head and a bill to fix it right away.

Knowing what is and is not covered by the HOA (Home Owners Association) is not the job of a home inspector.  A good inspector will inspect the roof of a condo and the common areas associated with the unit being inspected.  Knox Home Inspections treats a condo the same as any other house.

Here’s an example…


That is the main entrance to a 6 unit, garden style condo building.  There are 2 electric code violations going on here and these people walk by, and over it every day.  The junction box directly below the door should not be in an area that has foot traffic, it should be off to the right and out of the walkway.  This is for safety.  The second violation is the circuit that is running into the gutter and up to the 3rd story flood light above.  The gutter is acting as a conduit for the circuit, it is also draining all of the water from the roof above.  Water and electricity DO NOT mix.  This whole situation should be re configured by an electrician ASAP.  This is a tricky situation for my client who is buying this unit.  My recommendation to them was to have this corrected by a professional.  Is this the responsibility of the buyer or the HOA?  That is where you want to read all of that paperwork we mentioned above and determine what to do from that.

Some HOA’s have zero fees.  Maintenance on these units can fall on the owners themselves and can be tricky with repairs and the cost of those repairs.  See the picture below of a Condex split down the middle.

All new vinyl siding on the right, and original wood siding on the left that is peeling badly.  The roof has been replaced on the right side and they wove it right into the old side on the left.  There is a lot of moss and lichen on the left side and that whole side needs to be replaced.  Also the dryer vent has no cover on it, it’s between the AC unit that is leaning over and the bulkhead.  That is direct access for critters and moisture, which can lead to damage.  The deck on the left is the original wood and the deck on the right is all new Trex material and is very nice.  This is clearly a situation where the HOA does not cover repairs on the exterior of the units.  Again you must read the CC&R to determine what is an is not covered for repairs.  Inspecting this unit was tricky because we could not inspect the other half of the house.  All we could do was inform them of what was seen from the outside and how that may effect there side.

Arm yourself with as much knowledge as possible before buying your condo.  Get a copy of all of the documents you can and read them all.  And don’t forget the home inspection…

Read more

Knox Home Inspections uses a state certified third party lab to give you the most accurate readings of what is actually in your water.  Individual or test packages are available for anything from Arsenic to Uranium.

Getting a water test is the best decision you can make when purchasing your home.  We will test your water for you even if you are not buying a home, just give us a call and we will come right over.  The test only takes 1-2 days and the knowledge of what you are drinking is worth way more than the cost of the test.  Here are some of the things that are available for testing:

  • Alkalinity:  Alkalinity is a measure of the capacity of water to neutralize acids or hydrogen ions. Alkalinity acts as a buffer if any changes are made to the water’s pH value. The Alkalinity in the water will help keep the water’s pH stabilized.
  • Arsenic: Arsenic is a semi-metal element in the periodic table. It is odorless and tasteless. It can enter drinking water supplies from natural deposits in the earth or from agricultural and industrial practices.
  • Chloride:  The EPA has identified 250 mg/L as a concentration at which chloride can be expected to cause a salty taste in drinking water. Water users typically notice the presence of high chloride before an equal amount of sodium.
  • Coliform & E. Coli:  Coliform bacteria are present in the environment and feces of all warm-blooded animals and humans. Coliform bacteria are unlikely to cause illness. However, their presence in drinking water indicates that disease-causing organisms could be in the water system.
  • Conductivity:  Conductivity is a measure of water’s capability to pass electrical flow. This ability is directly related to the concentration of ions in the water.  These conductive ions come from dissolved salts and inorganic materials such as alkalis, chlorides, sulfides and carbonate compounds.
  • Copper: The level of copper in surface and groundwater is generally very low. High levels of copper may get into the environment through mining, farming, manufacturing operations, and municipal or industrial wastewater releases into rivers and lakes. Copper can get into drinking water either by directly contaminating well water or through corrosion of copper pipes if your water is acidic. Corrosion of pipes is by far the greatest cause for concern.
  • Fluoride:  Water fluoridation is the controlled addition of fluoride to a public water supply to reduce tooth decay. Fluoridated water has fluoride at a level that is effective for preventing cavities; this can occur naturally or by adding fluoride.
  • Hardness:  The amount of dissolved calcium and magnesium in the water.  Hard water can gum up your plumbing and cause problems with forced hot water systems.  It can also leave spots on your dishes in the dishwasher and make you use more soap.
  • Iron:  The thing that you’ll notice the most from water that is high in iron is that the water may taste metallic. The water may be discolored and appear brownish, and it may even contain sediment. Iron will leave red or orange rust stains in the sink, toilet and bathtub or shower. It can build up in your dishwasher and discolor ceramic dishes. It can also enter into the water heater and can get into the laundry equipment and cause stains on clothing. The EPA cautions that although iron in drinking water is safe to ingest, the iron sediments may contain trace impurities or harbor bacteria that can be harmful.
  • Manganese:  Manganese is a mineral that naturally occurs in rocks and soil and may also be present due to underground pollution sources. Manganese is seldom found alone in a water supply. It is frequently found in iron-bearing waters but is more rare than iron.
  • Nitrate:  Nitrate is one of the most common groundwater contaminants in rural areas. It is regulated in drinking water primarily because excess levels can cause methemoglobinemia, or “blue baby” disease.
  • Nitrite:  Nitrites are a salt or ester anion of nitrous acid, which can be naturally or artificially occurring in groundwater. Nitrites come from fertilizers through run-off water, sewage, and mineral deposits. Nitrite is used in food production for the curing of meat products due to it inhibiting the growth of bacteria. Unfortunately it can also stimulate the grown of bacteria when introduced in high levels into a body of water.
  • Lead:  Lead enters the water through contact with the plumbing.  Lead leaches into water through corrosion, a dissolving or wearing away of metal caused by a chemical reaction between water and your plumbing.
  • pH:  The pH of pure water is 7. In general, water with a pH lower than 7 is considered acidic, and with a pH greater than 7 is considered basic. The normal range for pH in surface water systems is 6.5 to 8.5, and the pH range for groundwater systems is between 6 to 8.5.
  • Radon:  Radon can be in your water and also in your air.  If a Radon air test results in a high result then a radon water test should be performed.  About 1.0 pCL in the air can result for every 10,000 pCL in the water.
  • Sodium:  The other half of salt (sodium chloride), this can get into your well from salt on the roads in the winter and washing off the road down into your well.
  • Uranium:  Believe it or not there is naturally occurring uranium in certain areas of New Hampshire, especially in the White Mountains.  If a radon water test comes back very high then a uranium test is recommended.
  • VOC’s (Volatile Organic Compounds):  Volatile Organic Chemicals (VOCs) are carbon-containing compounds that evaporate easily from water into air at normal air temperatures. (This is why the distinctive odor of gasoline and many solvents can easily be detected.) VOCs are contained in a wide variety of commercial, industrial and residential products including fuel oils, gasoline, solvents, cleaners and degreasers, paints, inks, dyes, refrigerants and pesticides.

If you are using a VA or FHA loan the bank will require you to get a water quality test.

If the pH balance in your water is off you could have premature wear in your houses plumbing leading to costly repairs down the road.

If you are close to a busy town road there could be road salt contaminating your well and putting Sodium and Chloride in your drinking water.

We have many different packages for water testing.  Click on our pricing below and see which package fits for you. Our Facebook fans also save $20.00 on all lab test packages just like our page.

2019 Price List

Read more

Radon is a dangerous gas that comes from the decaying of Uranium in the ground. It is naturally a gas and can be inhaled, eventually leading to lung cancer. It is the second leading cause of lung cancer behind smoking and ahead of second hand smoke. Radon is especially dangerous in residential housing because it can concentrate in basements and crawlspaces. The scariest part is that it is odorless, colorless and tasteless. The ONLY way to know if you have Radon is to test specifically for it.  Radon can also be in your well water which can lead to higher levels in the air.  This blog focuses on radon in the air, for radon in the water read my water blog...

Knox Home Inspections uses the BEST radon measuring devices on the market.  These machines will give you much more data than any other Home Inspectors out there and your results will be available much quicker than our competition.  


In New Hampshire we have a higher concentration of Radon than in other parts of the country, especially Carroll County.  For this reason I recommend an air test in every house that I inspect.  Radon can be in all the houses in your neighborhood or in just a few, the only way to know if it is in your home is to have it tested by a professional.  The results will tell you the Radon level and you can decide if you need to mitigate or not.

The EPA recommends action be taken if you have over 4.0 pCi/L. I have performed a lot of Radon tests in New Hampshire and  keep very detailed records. The average Radon level in a basement with NO mitigation system is 5.2 pCi/L.  So some are higher and some are lower. The average radon level with a system in place is 1.2 pCi/L. These systems work, and they can save lives.

In 2016 alone I came to FIVE separate homes with Radon mitigation systems that were turned OFF! If you have a system in place it needs to be ON at all times. The fan does not use a lot of electricity, about the same as a bathroom fan and it should also be as quiet as one. If it is louder than a small fan you should replace the fan unit. The fans are around $125 a piece.

Radon mitigation is not as expensive as some people fear it is. A basic, full system normally starts around $1000. Depending on the layout of the house they can be installed easily. Here’s one that runs out the side of the basement: 

dsc01902dsc01904-e1487710509798

The fan above is one of the systems I found that was OFF. Please make sure if you are buying a home that the system is ON before you even schedule a home inspection. I could not test this system that day because it would accomplish nothing. Instead the buyers Real Estate Agent had to contact the seller, get them to turn it on, and then I went back and did the test. This cost the home buyers valuable time during the closing process and was an unnecessary delay and added stress for everyone involved.

Knox Home Inspections is certified by the International Association of Certified Indoor Air Consultants for Advanced Radon Air Measurement. We guarantee an accurate Radon test for all of our customers for just $125. It is worth every penny to know that your home is free and clear of radon.

If you have any Radon Air questions feel free to contact us at anytime.

Read more

That’s not a new Snapchat filter. That’s Thermal Imaging with a professional FLIR Infrared camera.  There are many different uses for an infrared camera like this.  It allows the user to capture differences in temperature, the dark purple is cold and the bright yellow is hot.  When choosing a Home Inspector make sure to choose one that uses this technology. Many areas of the home are inaccessible to the eye and without thermal imaging a lot of issues can go un checked.

This tool can help to identify air intrusion and extrusion, moisture intrusion, plumbing leaks, roof leaks, insulation gaps, overloaded electric circuits, HVAC leaks, and much more.  A quick scan with the thermal camera is a great addition to any Home Inspection.

Some people seem to think that a thermal camera can “see” through the wall or through clothing.  This is NOT true.  The camera captures radiation from whatever it is looking at. For example, thats me in the picture at the top.  It was a cold day and I took my jacket off and all the heat radiated off my body and was captured by the camera, but you can’t see through my shirt.

Above you can see a missing section of insulation in the wall and heat is escaping.  This day was very cold and the heat loss really popped off the camera screen.

From the inside of another house.  To get the best thermal images I turn the heat way up to get a better Delta T (Difference in Temperature).  Windows lose a lot of heat, but those cold spots creeping up the wall from the ground are moisture.  This is called “Rising Damp”.  Moisture rises up the siding and causes damage and possibly mold.

Lastly is a heat lamp in an attic directly above a bathroom.  There is so much heat it looks like it is on fire!  There is zero insulation around the lamp which is leaking very warm air into the cold attic.  Warm air + Cold Air = Moisture.  Not good for an attic without proper ventilation.

These are just a few of the things I have seen using Thermal Imaging.  I use the thermal camera on every home inspection because it allows me to see things that I could never have seen with my naked eyes.

Energy Efficiency is a breeze with a thermal camera.  You can hunt for heat loss and gaps in heat supply piping.  A quick scan of a home on  very cold or very warm day can narrow down areas where small improvements can make a big difference on the heating and electric bill.

If you have questions about thermal imaging just contact us and we will be glad to help.

Read more